| Whenever you take a picture with a camera, or scan
an image, the firmware of your camera or your scanner captures not just
the actual image itself, but also additional data that describes the
environment in which the image was taken. This data is called metadata
and its understanding and utilization can be an invaluable aid in your
workflow.
Part 3 of this series looks at altering read-only metadata and why
you might want to consider it for your workflow.
Altering Metadata
There are many ways to alter metadata – one
of the easiest ways is to use Adobe Bridge, which comes with Adobe
Photoshop CS2. But most
programs severely limit the kind of metadata fields that can be changed.
In most cases, it is limited to IPTC metadata. But what, if you want
to change some other, typically read-only data, such as EXIF data?
A good question would also be why you would even want to alter EXIF
metadata. After all, there is a reason why certain types of metadata
are read-only. Although there might be many reasons for altering such
metadata, two come immediately to mind:
1. If you scan a slide, the scan does
not produce any camera and image related metadata. If you still have
the aperture or ISO settings of
a particular image that was scanned from a slide, you would want the
ability to enter these and write them to the EXIF metadata.
2. If you
stitch a panorama from multiple images, all of the metadata resides
in the originals, but most stitching programs do not transfer
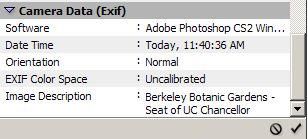
even parts of that metadata to the newly stitched image. The following
screen shot exemplifies that none of the original images’ metadata
shows up in a new image that was stitched with Photoshop’s
Photomerge, although Photomerge writes at least some metadata.
Others, like Panorama
Factory, do not write any EXIF metadata at all!

EXIF metadata of an image stitched with Adobe Photoshop’s Photomerge
How can you (over)write read-only metadata? While there are some programs,
such as Exifer, that can alter certain parts of EXIF data, I finally
found one tool set that can alter all the metadata that I need to,
plus more: many different formats, including EXIF, IPTC, XMP, GPS,
maker data and more, are supported. The name of the tool set: Exiftool!
Note: Maybe the creator of Exiftool should think about renaming it
to reflect that you can alter more than just EXIF metadata with this
tool.
Installing ExifTool
When checking out Exiftool, which is freeware, I realized immediately
that installation would not be easy compared with other graphics
programs. Since Exiftool is actually a set of PERL scripts and not
an executable,
you will also have to install PERL (which comes pre-loaded on Linux/Unix
systems, but not on Windows or on Mac OS). Fortunately, Exiftool
points you to the ActivePerl site where you can download a free version
of
PERL, which I did. While I have not tried, I would assume that Exiftool
would also run with any other PERL implementations that you can find
on the Net. Following are the steps you need to take to get Exiftool up and running:
1. Download a free copy of ActivePERL from http://www.activeperl.com/Products/ActivePerl/.
They have versions for both Windows and the Mac. Since the
Windows version is a Microsoft Installer (.msi) file, just
double-click and
install it with all the default options.
2. Download Exiftool
from http://www.sno.phy.queensu.ca/~phil/exiftool/ and you
receive a .gz file, which can be decompressed with any ZIP
file program such as WinZIP or pkzip. Since it does not contain
an installer, you have to manually copy it wherever you want
it. Since
I installed ActivePerl in c:\perl, I just copied exiftool to
c:\perl\exiftool
3. Don’t forget to open the Exiftool
documentation at the same time and, if you want to, save it
to your hard drive, so
you can
access it whenever you are offline.
Using ExifTool
Since Exiftool is a set of scripts, you cannot
run them from Windows Explorer or any other File Manager. You
have to open
a command window
(Click Start -> Run, then enter “cmd “and press
Enter), navigate to the folder where your pictures are stored
and run the commands
from there (a nice short-cut, which I use, is to install the
CmdHere powertoy from Microsoft, so you can right-click on a
folder in Windows
Explorer and then select “Open Command Window Here”) Note: While Exiftool can read Photoshop PSD files, it cannot write
to them. You might have to convert them to TIFF before you can write
metadata to them.
Exiftool can read and write metadata. Two examples:
Writing a metadata entry to an image:
c:\perl\bin\perl c:\perl\exiftool\exiftool –ApertureValue=8
test.tif
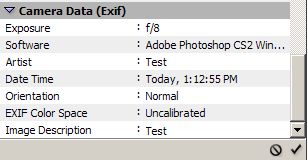
This command calls perl and runs the script called exiftool. It tells
Exiftool to write an aperture of 8 to the EXIF field ApertureValue
in the file test.tif.

After writing an Aperture Value of 8 to an image
Copying Metadata from another image
This is what I really want to do: I want to copy all or select metadata
from one of my original images to the newly stitched panorama. This
can be done the following way:
c:\perl\bin\perl c:\perl\exiftool\exiftool –tagsfromfile original.tif –exif:all
test.tif
Again, this command calls perl and runs the script called exiftool.
It tells Exiftool to read all the tags from the original image called
original.tif. It copies all the EXIF data but none of the other data
to my stitched image called test.tif.
Using ExifTool in my workflow
Since I only need to alter metadata in stitched panoramas, I only
use the option to copy metadata from one image to another. For my workflow,
I decided to not copy all the EXIF information from the original, but
to only copy select EXIF metadata. I will always copy all the IPTC
metadata.
To further simplify my workflow, I created a batch file (named panometadata.bat,
which can be downloaded at http://www.irtenkauf.com/articles/panometadata.bat),
so I do not have to type long commands, which is a very error-prone
task. Since I will always transfer the same metadata from the original
file to the stitched panorama, I can easily code the Exiftool metadata
flags into the batch file.
The batch file will be executed in the command window by typing:
panometadata.bat
original.tif test.tif The script itself copies, among others, IPTC data plus exposure, focal
length, ISO settings, white balance info, the original time when the
image was taken as well as camera make and model. The script looks
like this:
 Exiftool
script called Panometadata.bat Exiftool
script called Panometadata.bat
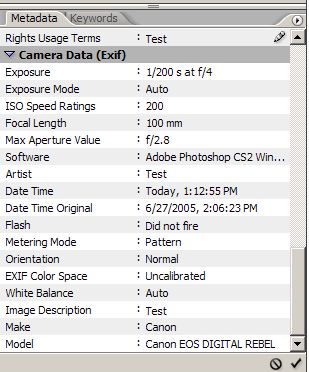
After running it, Adobe Bridge displays the copied metadata in the
panorama image:

Select EXIF metadata was copied from the original image
Conclusion
You might never have the need to alter any read-only
metadata, but it is a very powerful way to preserve metadata
rather than
not being
able to carry it forward through your workflow process. Exiftool
is a tool that can help you with it and it is definitely worth
a try. Part 4 of this series will cover XMP in your workflow.
|